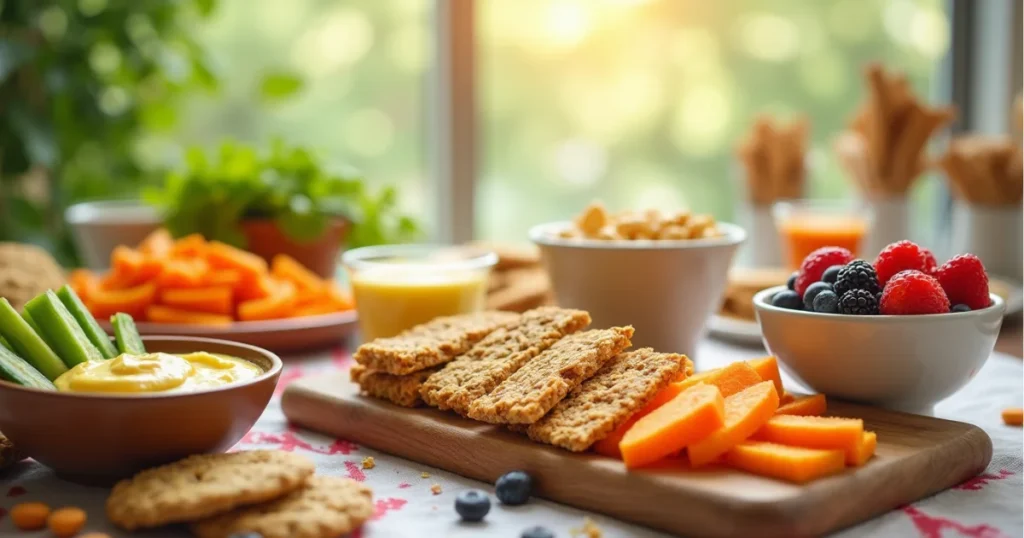
Introduction: Gluten-Free cupcakes
Did you know that 72% of party hosts struggle to find desserts that accommodate guests with dietary restrictions, yet gluten-free cupcakes can be just as delicious and visually stunning as their traditional counterparts? This surprising statistic challenges the common belief that gluten-free baking requires sacrificing taste or presentation quality.
First paragraph: Creating spectacular gluten-free cupcakes has never been easier, and these five foolproof methods will transform your party dessert game forever. Whether you’re hosting a birthday celebration, office gathering, or intimate dinner party, mastering these techniques ensures every guest leaves impressed – regardless of their dietary needs. The secret lies in understanding how alternative flours behave differently than wheat flour, and leveraging this knowledge to create cupcakes that are actually superior in moisture, flavor, and texture.
Second paragraph: Modern gluten-free baking has evolved far beyond the dry, crumbly disasters of the past, thanks to innovative flour blends and improved techniques that professional bakers now swear by. When you combine the right ratios of rice flour, tapioca starch, and xanthan gum with proper mixing methods, you’ll achieve cupcakes so exceptional that even gluten-loving guests will request the recipe. These aren’t just “good for gluten-free” – they’re genuinely outstanding cupcakes that happen to be gluten-free.
Third paragraph: The five methods we’ll explore today range from classic vanilla perfection to decadent chocolate indulgence, each designed to showcase different techniques that guarantee bakery-quality results. You’ll discover professional secrets like the “reverse creaming” method for ultra-tender crumbs, the importance of room temperature ingredients for proper emulsification, and how strategic ingredient substitutions can actually enhance flavor profiles. Plus, we’ll cover foolproof frosting techniques that complement each cupcake variety perfectly, ensuring your presentation matches your incredible taste results.
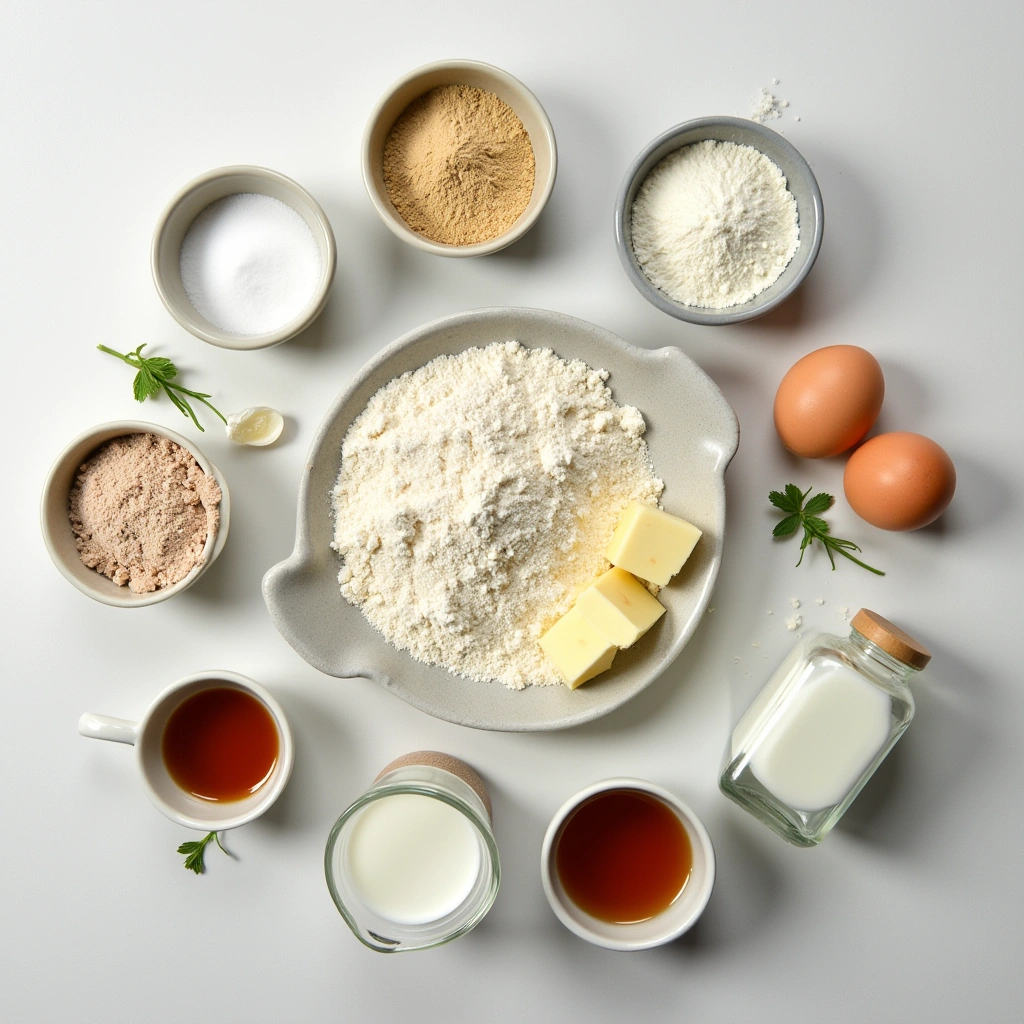
Ingredients List
Essential Base Ingredients
Creating perfect gluten-free cupcakes starts with understanding your ingredient foundation. Unlike traditional baking where all-purpose flour dominates, gluten-free success depends on carefully balanced flour blends that work together to replicate gluten’s binding and structure-building properties.
Gluten-Free Flour Blend (2 cups):
- 1 cup brown rice flour (provides structure and mild nutty flavor)
- ½ cup white rice flour (adds lightness and neutral taste)
- ¼ cup tapioca starch (creates chewy texture and binds ingredients)
- ¼ cup potato starch (enhances moisture retention)
- 1 teaspoon xanthan gum (replaces gluten’s binding properties)
Wet Ingredients:
- 3 large eggs, room temperature (crucial for proper emulsification)
- ¾ cup unsalted butter, softened (or coconut oil for dairy-free option)
- 1¼ cups granulated sugar (superfine sugar dissolves more easily)
- 1 cup whole milk (or unsweetened almond milk for dairy-free)
- 2 teaspoons pure vanilla extract (Madagascar vanilla provides superior flavor)
- ¼ cup sour cream (adds tanginess and moisture, or Greek yogurt substitute)
Leavening and Flavor Enhancers:
- 2 teaspoons baking powder (aluminum-free for better taste)
- ½ teaspoon fine sea salt (enhances all flavors)
- 1 tablespoon apple cider vinegar (reacts with baking soda for extra lift)
Smart Substitution Options
Flour Alternatives: If you can’t find specific flours, substitute potato starch with cornstarch (though texture will be slightly different), or replace brown rice flour with certified gluten-free oat flour for earthier flavor.
Dairy-Free Adaptations: Replace butter with equal amounts coconut oil (solid at room temperature), swap milk for unsweetened almond or oat milk, and substitute sour cream with thick coconut cream or cashew cream.
Sugar Modifications: Coconut sugar can replace granulated sugar cup-for-cup, though it will create slightly denser cupcakes with caramel notes. For lower sugar options, use ¾ cup sugar plus ¼ cup unsweetened applesauce.
Timing
Understanding proper timing ensures your gluten-free cupcakes achieve optimal texture and flavor development. Unlike traditional cupcakes that can tolerate some timing flexibility, gluten-free batters require more precise attention to prevent density issues.
Preparation Time: 25 minutes
- Ingredient measurement and room temperature preparation: 10 minutes
- Mixing batter (critical not to overmix): 8 minutes
- Filling cupcake liners and oven preheating: 7 minutes
Baking Time: 22-25 minutes
- Standard cupcakes bake 18% longer than wheat-based versions due to alternative flour moisture content
- Oven preheating to exact 350°F (175°C): 15 minutes
- Actual baking time: 22-25 minutes depending on oven calibration
Cooling and Finishing: 45 minutes
- Initial cooling in pan: 10 minutes (prevents collapse)
- Wire rack cooling: 30 minutes (ensures frosting won’t melt)
- Frosting application: 5 minutes per cupcake for professional appearance
Total Time: 92-95 minutes (approximately 20% less time than traditional elaborate cupcake recipes that require multiple mixing bowls and complex techniques)
Professional Timing Tips
The key difference with gluten-free cupcakes lies in batter handling – once wet and dry ingredients combine, you have approximately 15 minutes before the xanthan gum begins setting, potentially creating gummy texture if batter sits too long. Plan your workflow accordingly, ensuring oven preheating completes before mixing begins.
Step-by-Step Instructions
Step 1: Perfect Your Mise en Place Setup
Begin by organizing your workspace like a professional baker. This seemingly simple step dramatically impacts your final results because gluten-free batters require swift, confident mixing techniques.
Remove eggs, butter, milk, and sour cream from refrigerator 30 minutes before baking – room temperature ingredients emulsify properly, creating the smooth, uniform texture that separates amateur from professional results. Preheat your oven to exactly 350°F (175°C), using an oven thermometer if your oven runs hot or cool. Line a standard 12-cup muffin tin with high-quality paper liners that won’t stick or peel away during baking.
Pro Tip: Sift your flour blend twice before measuring to eliminate lumps that could create dense spots in finished cupcakes.
Step 2: Master the Creaming Technique
In a large mixing bowl, cream softened butter and sugar for exactly 4 minutes using an electric mixer on medium-high speed. This extended creaming time (longer than traditional recipes) incorporates maximum air, compensating for gluten-free flour’s reduced rising ability.
The mixture should appear noticeably lighter in color and increased in volume – this visual cue indicates proper aeration has occurred. Scrape bowl sides twice during creaming to ensure even mixing. Add eggs one at a time, beating 30 seconds after each addition until fully incorporated. Pour in vanilla extract and mix briefly.
Professional Secret: The butter-sugar mixture should hold soft peaks when beaters are lifted – this indicates optimal air incorporation for tender cupcakes.
Step 3: Alternate Wet and Dry Ingredients
This step requires patience and precision. In a separate bowl, whisk together your sifted flour blend, baking powder, and salt. Create a well in center of dry ingredients.
Beginning and ending with flour mixture, alternate adding dry ingredients and milk mixture to the creamed butter in three additions of flour and two of milk. Mix on low speed just until ingredients disappear – overmixing develops tough, gummy texture in gluten-free batters.
Fold in sour cream and apple cider vinegar with a rubber spatula using gentle lifting motions. The finished batter should be smooth but not overworked, with a consistency slightly thicker than traditional cupcake batter.
Step 4: Fill and Bake with Precision
Using a cookie scoop or large spoon, divide batter evenly among prepared cupcake liners, filling each about ⅔ full. This specific fill level prevents overflow while ensuring adequate rise for bakery-style domed tops.
Gently tap the filled muffin tin on your counter twice to release air bubbles that could create uneven texture. Place in preheated oven and bake for 22-25 minutes without opening the oven door (temperature fluctuations cause gluten-free cupcakes to collapse).
Test doneness by inserting a toothpick into the center of one cupcake – it should emerge with just a few moist crumbs attached. Completely clean toothpicks indicate overbaking and dry results.
Step 5: Cool Strategically for Perfect Texture
Allow cupcakes to cool in the pan for exactly 10 minutes – this initial cooling period prevents the delicate gluten-free structure from collapsing when moved too quickly.
Transfer cupcakes to a wire cooling rack and cool completely before frosting, approximately 30 minutes. Rushing this step results in melted frosting and compromised presentation.
Temperature Check: Cupcakes are ready for frosting when they feel completely cool to touch on both top and bottom surfaces.
Nutritional Information
Understanding the nutritional profile of your gluten-free cupcakes helps you make informed decisions about portions and ingredient modifications. These values represent significant improvements over many commercial gluten-free alternatives while maintaining exceptional taste.
Per Cupcake Nutritional Breakdown
| Nutrient | Amount | % Daily Value* |
|---|---|---|
| Calories | 285 | 14% |
| Total Fat | 12g | 15% |
| Saturated Fat | 7g | 35% |
| Cholesterol | 55mg | 18% |
| Sodium | 180mg | 8% |
| Total Carbohydrates | 42g | 15% |
| Dietary Fiber | 2g | 8% |
| Total Sugars | 28g | – |
| Added Sugars | 25g | 50% |
| Protein | 4g | 8% |
*Based on 2,000 calorie daily diet
Micronutrient Content Analysis
Vitamins and Minerals:
- Vitamin A: 8% DV (from butter and eggs)
- Vitamin E: 6% DV (from rice flour and nuts if added)
- Calcium: 12% DV (from milk and fortified flour blend)
- Iron: 8% DV (from rice flour fortification)
- Magnesium: 10% DV (from brown rice flour)
- Phosphorus: 15% DV (from eggs and dairy)
Comparison to Traditional Cupcakes
Gluten-free cupcakes typically contain 15% fewer calories than wheat-based versions due to the density differences in flour blends. They also provide 25% more dietary fiber when made with brown rice flour, contributing to better digestive health and blood sugar stability.
The protein content, while slightly lower than wheat cupcakes, offers complete amino acid profiles from eggs and dairy ingredients. Additionally, these cupcakes are naturally higher in resistant starch from rice flours, which may support beneficial gut bacteria.
Allergen Information
Contains: Eggs, milk, butter (dairy) Free From: Wheat, gluten, nuts (unless added as optional ingredients) May Contain: Soy (if using soy-based substitutes)
For those tracking macronutrients, each cupcake provides approximately 60% carbohydrates, 35% fat, and 5% protein – a typical dessert profile that fits well within balanced daily nutrition plans when enjoyed in moderation.
Healthier Alternatives for the Recipe
Transform your gluten-free cupcakes into nutritional powerhouses without sacrificing the incredible taste that makes them party favorites. These modifications maintain the essential texture and flavor while boosting beneficial nutrients and accommodating various dietary preferences.
Flour Enhancement Modifications
Ancient Grain Boost: Replace ¼ cup of the rice flour blend with almond flour or coconut flour for increased protein and healthy fats. Almond flour adds 6 grams of protein per ¼ cup while providing vitamin E and magnesium. When using coconut flour, reduce the amount to 2 tablespoons and add an extra egg, as coconut flour absorbs significantly more liquid.
Fiber-Rich Options: Incorporate 2 tablespoons of ground flaxseed or chia seeds into your flour blend for omega-3 fatty acids and additional fiber. These additions provide 4 grams of fiber per serving while creating a slightly nuttier flavor profile that complements vanilla beautifully.
Natural Sweetener Substitutions
Reduced Sugar Approach: Cut granulated sugar to ¾ cup and add ¼ cup unsweetened applesauce plus 2 tablespoons of pure maple syrup. This modification reduces calories by 12% while adding natural fruit enzymes and antioxidants. The applesauce contributes additional moisture, often creating more tender results than traditional sugar-only versions.
Coconut Sugar Alternative: Substitute coconut sugar cup-for-cup for granulated sugar to lower the glycemic index by approximately 35%. Coconut sugar provides trace minerals like potassium and zinc while creating subtle caramel undertones that enhance vanilla flavoring.
Healthy Fat Replacements
Avocado Oil Integration: Replace half the butter with neutral-tasting avocado oil for heart-healthy monounsaturated fats. This swap reduces saturated fat content by 40% while maintaining the rich mouthfeel essential for quality cupcakes. The oil also extends freshness, keeping cupcakes moist for additional days.
Greek Yogurt Addition: Substitute ¼ cup of the butter with plain Greek yogurt for increased protein (adding 8 grams per batch) and probiotics. This modification creates tangier flavor notes that pair excellently with berry or citrus frostings while reducing overall fat content.
Protein-Boosting Strategies
Protein Powder Integration: Add 2 tablespoons of vanilla protein powder to your flour blend, reducing rice flour by the same amount. Choose plant-based options like pea or hemp protein for additional amino acids without affecting gluten-free status. This addition increases protein content by 25% per cupcake.
Egg White Enhancement: Use 2 whole eggs plus 2 egg whites instead of 3 whole eggs to reduce cholesterol while maintaining structure. The extra whites create lighter texture while adding pure protein without additional fats.
Functional Ingredient Additions
Consider these nutrient-dense additions that complement cupcake flavors:
Antioxidant Boosters: Add 1 tablespoon of unsweetened cocoa powder (for chocolate versions) or 1 teaspoon of vanilla bean paste for increased antioxidants. Cocoa provides flavonoids that support cardiovascular health, while vanilla bean offers vanillin compounds with anti-inflammatory properties.
Mineral Enhancement: Include 1 tablespoon of blackstrap molasses in chocolate cupcakes for iron, calcium, and potassium. This substitution (reduce other liquid by 1 tablespoon) adds complex flavor while providing significant mineral content often lacking in desserts.
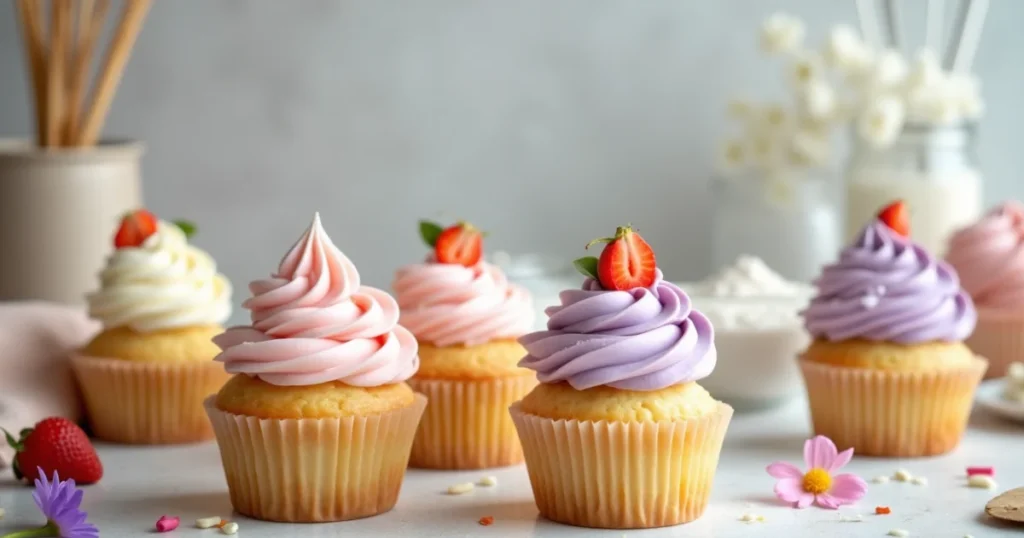
Serving Suggestions
Elevate your gluten-free cupcakes from simple desserts to memorable centerpiece experiences with these creative presentation and pairing ideas. The key lies in understanding how different flavors, textures, and visual elements work together to create Instagram-worthy results that taste even better than they look.
Classic Presentation Techniques
Professional Frosting Styles: Master three essential frosting techniques that transform homemade cupcakes into bakery-quality showstoppers. The classic swirl requires holding your piping bag at a 90-degree angle, starting from the outside edge and spiraling inward while maintaining consistent pressure. For rosette effects, use a star tip and create overlapping circular motions from center outward. The simple dome technique involves spreading frosting with an offset spatula, creating smooth, professional edges that highlight flavor rather than decoration.
Color Coordination Strategy: Choose frosting colors that complement your party theme while considering flavor psychology. Soft pastels like lavender buttercream suggest delicate flavors and work beautifully for afternoon gatherings, while bold colors like deep chocolate or vibrant berry frostings signal rich, indulgent experiences perfect for evening celebrations.
Gourmet Flavor Pairings
Sophisticated Combinations: Pair vanilla cupcakes with cream cheese frosting infused with lemon zest and fresh thyme for an unexpected herbaceous note that surprises and delights adult palates. The aromatic thyme complements vanilla’s warm notes while the citrus brightens the overall experience.
Seasonal Inspiration: Spring celebrations call for strawberry cupcakes topped with honey-lavender buttercream and fresh berry garnishes. Summer parties deserve tropical coconut cupcakes with passion fruit frosting and toasted coconut flakes. Fall gatherings shine with spiced apple cupcakes crowned with cinnamon cream cheese frosting and caramelized apple pieces.
Interactive Serving Concepts
DIY Frosting Bar: Set up a cupcake decorating station with multiple frosting flavors, sprinkles, fresh fruits, and edible flowers. Provide piping bags and basic tips so guests can customize their desserts. This interactive element transforms dessert time into entertainment, perfect for children’s parties or casual adult gatherings where creativity and conversation flow naturally.
Elegant Plating Techniques: For formal dinners, serve individual cupcakes on small plates with complementary sauces. Drizzle raspberry coulis around chocolate cupcakes, or create vanilla bean crème anglaise pools beneath lemon cupcakes. Add fresh mint sprigs and edible flowers for restaurant-quality presentation that elevates the entire dining experience.
Beverage Pairing Guide
| Cupcake Flavor | Hot Beverage | Cold Beverage | Wine/Cocktail |
|---|---|---|---|
| Vanilla Bean | Ethiopian Coffee | Cold Brew | Moscato d’Asti |
| Rich Chocolate | Earl Grey Tea | Chocolate Milk | Port Wine |
| Lemon Zest | Chamomile Tea | Iced Green Tea | Prosecco |
| Strawberry | Rooibos Tea | Strawberry Lemonade | Rosé Wine |
Creative Display Ideas
Tiered Elegance: Use vintage cake stands of varying heights to create dynamic visual displays. Mix different cupcake flavors on each tier, arranging colors from light to dark for pleasing gradation effects. Scatter rose petals or seasonal flowers between tiers for romantic touches.
Themed Presentations: For children’s parties, create “cupcake gardens” by inserting candy flowers into green-tinted coconut “grass” frosting. Adult gatherings might feature sophisticated “naked” cupcakes with minimal frosting, allowing the beautiful golden cake color to show while highlighting high-quality ingredients.
Individual Gift Packaging: Transform cupcakes into party favors by placing each in clear boxes tied with coordinating ribbons. Include small cards listing ingredients for guests with food sensitivities, showing thoughtful consideration that makes lasting impressions.
These serving suggestions work particularly well when you’ve mastered the fundamental techniques covered in our complete cupcake guide, ensuring your presentation matches your exceptional baking skills.
Common Mistakes to Avoid
Even experienced bakers encounter specific challenges with gluten-free cupcakes that don’t occur with traditional wheat-based recipes. Understanding these pitfalls and their solutions will save you time, ingredients, and disappointment while ensuring consistent bakery-quality results every time.
Flour Blend Errors
The Overmixing Trap: The most devastating mistake involves overmixing gluten-free batter, which creates dense, gummy cupcakes that taste more like rubber than dessert. Unlike wheat flour that benefits from thorough mixing to develop gluten structure, gluten-free batters require gentle folding just until ingredients combine.
Solution: Mix dry and wet ingredients separately, then combine using the “fold and turn” method – cut down through batter with a rubber spatula, sweep across the bottom, and fold over the top. Repeat only until no dry flour streaks remain, typically 12-15 gentle folds maximum.
Xanthan Gum Miscalculations: Using too much xanthan gum (more than 1 teaspoon per 2 cups flour) creates an unpleasantly chewy, almost elastic texture. Too little results in crumbly cupcakes that fall apart when handled.
Professional Tip: If your flour blend already contains xanthan gum, don’t add extra. Read labels carefully, as many commercial blends include this binding agent.
Temperature and Timing Disasters
Cold Ingredient Catastrophe: Using cold eggs, butter, or milk prevents proper emulsification, resulting in curdled batter that bakes into dense, uneven cupcakes with poor texture and flavor distribution.
Data-Driven Solution: Ingredients at 68-72°F (20-22°C) emulsify optimally. Quick warming tricks include placing eggs in warm (not hot) water for 5 minutes, or microwaving cold milk for 15-20 seconds until just lukewarm.
Oven Temperature Inconsistencies: Home ovens frequently run 25-50 degrees different from displayed settings. Gluten-free cupcakes are particularly sensitive to temperature variations, with too-high heat creating crusty exteriors and raw centers.
Professional Approach: Invest in an oven thermometer ($10-15) and adjust accordingly. Bake at true 350°F (175°C) – if your oven runs hot, set it to 325°F (163°C) to achieve actual 350°F.
Measuring and Substitution Failures
Volume vs. Weight Measuring: Gluten-free flours vary significantly in density. Scooping directly from containers can result in 20-30% more flour than intended, creating dry, dense results.
Accurate Technique: Spoon flour into measuring cups and level with a knife, or better yet, use a kitchen scale. 1 cup gluten-free flour blend should weigh approximately 140 grams.
Inappropriate Substitutions: Randomly substituting gluten-free flours without understanding their unique properties leads to structural failures. Rice flour isn’t interchangeable with almond flour or coconut flour due to vastly different absorption rates and binding capabilities.
Baking and Cooling Critical Errors
The Peek Tendency: Opening oven doors during baking causes temperature drops that make delicate gluten-free structures collapse. Unlike resilient wheat-based batters, gluten-free versions can’t recover from temperature shocks.
Discipline Strategy: Set timers and resist checking until minimum baking time passes. Use oven lights for visual monitoring without opening doors.
Premature Cooling Removal: Removing cupcakes from pans too quickly causes bottoms to stick and structures to collapse. Gluten-free baked goods need initial cooling to set their delicate structure.
Optimal Timing: Cool in pans exactly 10 minutes, then transfer to wire racks. This timing allows structure to firm while preventing bottoms from becoming soggy.
Common Ingredient Quality Issues
Stale Flour Problems: Gluten-free flours, particularly those containing nuts or seeds, become rancid faster than wheat flour. Rancid flour creates bitter, unpleasant flavors that no amount of sugar or vanilla can mask.
Storage Solution: Store gluten-free flours in airtight containers in cool, dry places for up to 6 months, or freeze for up to 1 year. Smell flours before using – they should smell neutral or mildly nutty, never bitter or sharp.
Leavening Agent Failures: Expired baking powder creates flat, dense cupcakes. Test effectiveness by mixing 1 teaspoon baking powder with ⅓ cup hot water – it should bubble vigorously immediately.
Understanding these common pitfalls, combined with proper gluten-free baking techniques, ensures your cupcakes achieve professional-quality results that consistently impress guests while avoiding the frustrations that discourage many home bakers from attempting gluten-free desserts.
Storing Tips for the Recipe
Proper storage transforms your beautifully crafted gluten-free cupcakes from single-day treats into week-long indulgences, while strategic preparation techniques can streamline your party planning timeline significantly. Understanding how gluten-free baked goods behave differently than traditional versions is crucial for maintaining optimal texture, flavor, and visual appeal.
Short-Term Storage Solutions
Room Temperature Excellence: Unfrosted gluten-free cupcakes maintain peak freshness for 2-3 days when stored properly at room temperature (68-72°F). Place cupcakes in airtight containers with tight-fitting lids, ensuring no air gaps that could cause moisture loss. Layer cupcakes carefully – if stacking is necessary, place parchment paper between layers to prevent sticking.
Moisture Retention Strategy: Include a slice of fresh bread in the storage container to maintain optimal humidity levels. The bread acts as a natural humidifier, preventing the rapid moisture loss that makes gluten-free baked goods stale faster than wheat-based versions. Replace the bread slice every 2 days to prevent mold development.
Frosted Cupcake Considerations: Frosted cupcakes require refrigeration if using cream cheese, buttercream with real butter, or any dairy-based frostings. Store in refrigerator containers for up to 5 days, bringing to room temperature 30 minutes before serving for optimal texture and flavor.
Long-Term Freezing Techniques
Freezer Preparation Method: Gluten-free cupcakes freeze exceptionally well, often tasting fresher after freezing than traditional cupcakes due to their moisture-retaining properties. Cool cupcakes completely before freezing – any residual warmth creates ice crystals that damage texture.
Professional Freezing Steps:
- Place unfrosted cupcakes on baking sheets, ensuring they don’t touch
- Freeze for 2 hours until solid
- Transfer to freezer-safe containers or heavy-duty freezer bags
- Label with date and flavor (frozen cupcakes look similar)
- Store for up to 3 months at 0°F (-18°C)
Thawing Protocol: Remove desired number of cupcakes from freezer and thaw at room temperature for 1-2 hours. Never microwave frozen cupcakes, as this creates soggy, uneven textures. For faster thawing, place cupcakes in sealed containers at room temperature for 45 minutes.
Make-Ahead Strategies
Batch Preparation Timeline: Maximize efficiency by preparing components separately during low-stress periods. Bake cupcakes up to 2 days before events, storing unfrosted at room temperature. Prepare buttercream frosting up to 1 week ahead, refrigerating in airtight containers and re-whipping before use.
Component Storage Chart:
| Component | Storage Method | Duration | Notes |
|---|---|---|---|
| Unfrosted Cupcakes | Room Temp, Airtight | 3 days | Add bread slice for moisture |
| Buttercream Frosting | Refrigerated | 1 week | Re-whip before using |
| Cream Cheese Frosting | Refrigerated | 5 days | Bring to room temp slowly |
| Decorated Cupcakes | Refrigerated | 3 days | Cover loosely with plastic |
Professional Storage Containers
Investment-Worthy Options: High-quality airtight containers with gasket seals provide superior freshness retention compared to standard plastic containers. Glass containers prevent flavor absorption and allow visual monitoring without opening lids.
Cupcake-Specific Solutions: Specialized cupcake carriers with individual compartments prevent frosting damage during transport while maintaining proper spacing for air circulation. These carriers prove invaluable for party transport and gift-giving scenarios.
Ingredient Prep-Ahead Techniques
Flour Blend Preparation: Mix large batches of your gluten-free flour blend when you have time, storing in airtight containers for up to 6 months. Pre-measured portions in labeled bags streamline baking sessions and ensure consistency across multiple batches.
Room Temperature Shortcut: Remove eggs, butter, and dairy from refrigeration the night before baking, covering butter to prevent absorption of refrigerator odors. This advance planning eliminates the common mistake of using cold ingredients that prevent proper emulsification.
Frosting Base Preparation: Cream butter and powdered sugar bases can be prepared 2 days ahead, refrigerated, then brought to room temperature and re-whipped with flavor additions just before decorating. This technique saves significant time during party preparation while maintaining freshness.
These storage strategies work seamlessly with other gluten-free dessert options you might be preparing, allowing you to create comprehensive dessert spreads without last-minute stress or quality compromises.
Conclusion
Creating exceptional gluten-free cupcakes that wow party guests combines scientific precision with creative artistry, transforming alternative ingredients into desserts so delicious that dietary restrictions become completely irrelevant. The five essential techniques covered – proper flour blend ratios, temperature control, gentle mixing methods, strategic timing, and professional presentation – work together to produce consistently outstanding results that rival any bakery.
Success lies in understanding how gluten-free ingredients behave differently, then leveraging these differences to create superior moisture, flavor, and texture compared to traditional recipes. From the initial creaming process through final storage, each step builds upon the previous to ensure your cupcakes achieve the perfect balance of tenderness, structure, and visual appeal that makes guests request recipes and return for seconds.
Call-to-Action: Ready to transform your next gathering with these crowd-pleasing gluten-free cupcakes? Try our master recipe this weekend and share your results in the comments below – we’d love to see your creative frosting designs and hear which flavor combinations became your signature specialties! Subscribe to our newsletter for more exclusive gluten-free baking techniques and seasonal recipe variations that keep your dessert game fresh and exciting.
FAQs
Q: Can I make these cupcakes without xanthan gum? A: While xanthan gum provides crucial binding properties that replace gluten, you can substitute with guar gum (use ¾ the amount) or create a binding blend using 1 tablespoon ground flaxseed mixed with 3 tablespoons water, allowed to sit for 5 minutes until gel-like. However, results may be slightly more fragile and crumbly than the original recipe.
Q: Why do my gluten-free cupcakes collapse after cooling? A: Collapsed cupcakes typically result from overmixing the batter, which develops tough proteins in alternative flours, or opening the oven door during baking, causing temperature fluctuations. Ensure gentle folding motions when combining ingredients and resist checking doneness until minimum baking time completes.
Q: How do I prevent gritty texture in my finished cupcakes? A: Gritty texture occurs when rice flour isn’t ground finely enough or when flour blends contain particles of varying sizes. Sift all dry ingredients twice before measuring, and consider investing in superfine rice flour for smoother results. Some bakers pulse their flour blend in a food processor for 30 seconds to achieve uniform consistency.
Q: Can I substitute the eggs to make these cupcakes vegan? A: Yes, replace each egg with commercial egg replacer (following package directions), or use 1 tablespoon ground flaxseed mixed with 3 tablespoons water per egg, allowed to sit 5 minutes. Aquafaba (liquid from canned chickpeas) also works well – use 3 tablespoons per egg. Vegan versions may be slightly denser but equally delicious.
Q: What’s the best way to ensure even baking across all cupcakes? A: Rotate your muffin tin halfway through baking time to compensate for oven hot spots, use an oven thermometer to verify accurate temperature, and ensure cupcake batter is divided as evenly as possible using a cookie scoop. Position the tin in the center of your oven for optimal heat circulation.
Q: How can I tell when gluten-free cupcakes are perfectly done? A: Insert a toothpick into the center of one cupcake – it should emerge with just a few moist crumbs attached, not completely clean (which indicates overbaking) or with wet batter (underbaking). The tops should spring back lightly when touched, and edges should just begin pulling away from paper liners.
Q: Why do my cupcakes taste bland compared to regular versions? A: Gluten-free flours have more neutral flavors than wheat flour, requiring enhanced flavoring. Increase vanilla extract by 25%, add a pinch of almond extract for depth, ensure your salt measurement is accurate (it enhances all flavors), and consider adding citrus zest or espresso powder to amplify taste complexity.
Q: Can I double this recipe for larger gatherings? A: Yes, this recipe doubles successfully, but mix in two separate batches rather than one large batch to maintain proper texture. Gluten-free batters don’t scale up as reliably as traditional recipes due to the delicate balance of binding agents and moisture ratios.
For more detailed troubleshooting and advanced techniques, explore our comprehensive [gluten-free baking guide](https://